Kubernetes-NGINX Ingress 인증 - Basic Auth
5 min read
쿠버네티스 NGINX Ingress 사용 시, 기본적인 인증 메커니즘을 추가하는 방법에 대해서 알아봅니다.
쿠버네티스 위에서 여러 서비스를 운영할 때 매번 각 서비스의 인증 체계를 구축하고 관리하는 일은 쉽지 않을 수 있습니다. 사실 대부분의 서비스들이 자체적인 인증 매커니즘을 가지고 있기 때문에 (jenkins, grafana, kibana, jupyterhub 등) helm 차트 설정만 잘해 준다면 개별 서비스 자체적으로 인증 시스템을 구축할 수 있습니다. 하지만 모든 서비스가 인증 체계를 가지진 않았고 여전히 바로 웹 페이지로 접근되는 서비스들도 많이 있습니다. 물론 그러한 서비스들도 보안 extension 패키지를 설치하거나 자체 개별을 통해 보안을 강화할 순 있지만 매번 일일이 이러한 것들을 챙기는 것은 번거로울 뿐만 아니라 지속적으로 관리하기가 힘듭니다. 이번 시간에는 최소한의 보안 인증 장치로 NGINX Ingress controller에서 제공하는 Basic Authentication에 대해서 알아보고 설정하는 방법에 대해 알아보도록 하겠습니다.
Basic Authentication
Basic Authentication은 쿠버네티스나 NGINX의 기능이 아니라 단순한 HTTP 프로토콜의 인증 방법 중 하나입니다. 특별한 패키지 설치 없이 HTTP 헤더에 아래과 같은 정보를 넘겨서 인증을 받을 수 있습니다.
Authorization: Basic *$base64(user:password)
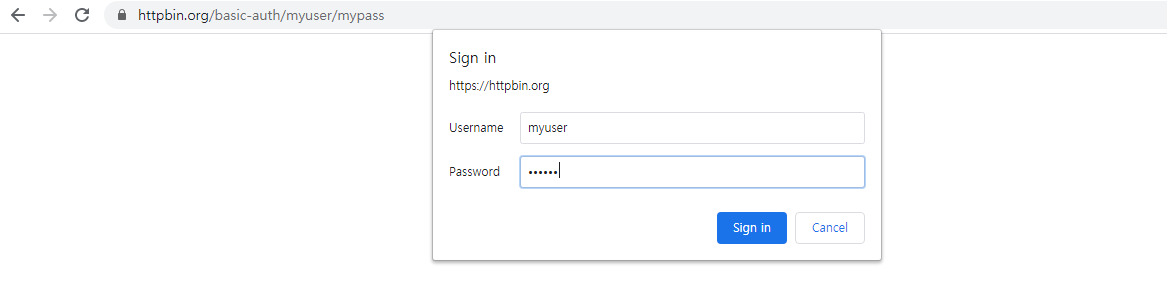
예를 들어, https://httpbin.org/basic-auth/myuser/mypass 라는 사이트는 user를 myuser 비밀번호를 mypass로 인증하는 페이지라고 한다면 아래와 같이 HTTP헤더를 보내게 되면 인증이 됩니다.
curl -v -H "Authorization: Basic $(echo -n myuser:mypass | base64)" https://httpbin.org/basic-auth/myuser/mypass
인증을 성공하면 원래 문서와 함께 200 코드를, 인증 실패시, 401 Unauthorized 코드를 반환 받습니다. 커맨드 호출 방식의 웹페이지 접근뿐만 아니라 웹 브라우저를 통한 페이지 접근시에도 인증 절차를 밟습니다. 웹 브라우저 자체적으로 Basic Auth 인증 방식을 내장하고 있습니다.
NGINX Ingress Basic Auth
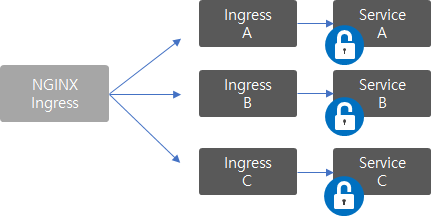
이제 쿠버네티스의 Ingress Controller 중 하나인 NGINX Ingress에서 어떻게 Basic Auth를 설정할 수 있는지 알아보고 그 장점에 간단히 설명 드리겠습니다. 이를 통해 사용자가 개별적인 Ingress 단계에서 서비스의 인증 설정을 할 수 있게 되어 필요에 따라 어플리케이션 레벨에서, 혹은 Ingress 레벨에서 인증을 선택할 수 있게 됩니다.
Static User
참고: https://kubernetes.github.io/ingress-nginx/examples/auth/basic/
Static User 방식은 미리 basic auth로 인증할 유저 리스트를 생성하고 해당 리스트에 포함된 인원만 인증될 수 있게 하는 방법입니다. 별다른 추가 작업 없이 사용자 인증을 할 수 있는 장점이 있는 반해 동적으로 사용자를 추가/삭제하지 못하는 단점이 있습니다.
1. auth 파일 생성
먼저 htpasswd를 통해 basic auth 사용자 파일을 생성합니다.
sudo apt-get install apache2-utils
# htpasswd 설치

# foo라는 사용자를 bar라는 비밀번호로 auth 파일에 생성
$ htpasswd -cb auth foo bar
# Adding password for user foo

$ ls
# auth                     # auth 라는 파일 생성
2. auth 파일을 이용한 Secret 생성
그러한 다음 그 값을 basic-auth라는 secert에 저장합니다.
# basic-auth라는 secret을 하나 생성합니다.
$ kubectl create secret generic basic-auth --from-file=auth
# secret "basic-auth" created

$ kubectl get secret basic-auth -o yaml
# apiVersion: v1
# data:
#   auth: Zm9vOiRhcHIxJE9GRzNYeWJwJGNrTDBGSERBa29YWUlsSDkuY3lzVDAK
# kind: Secret
# metadata:
#   name: basic-auth
#   namespace: default
# type: Opaque
3. Ingress 생성시 basic auth 관련 annotation 추가
마지막으로 특정 서비스의 Ingress 설정시 annotations 프로퍼티에 다음과 같은 설정을 하면 됩니다.
# auth-ingress.yaml
apiVersion: networking.k8s.io/v1beta1
kind: Ingress
metadata:
  name: ingress-with-auth
  annotations:
    # 인증 방법 설정: basic auth
    nginx.ingress.kubernetes.io/auth-type: basic
    # basic auth 사용자가 들어있는 secret 설정
    nginx.ingress.kubernetes.io/auth-secret: basic-auth
    # 인증 요청시 나오는 메세지 설정
    nginx.ingress.kubernetes.io/auth-realm: 'Authentication Required - foo'
spec:
  rules:
  - host: foo.bar.com
    http:
      paths:
      - path: /
        backend:
          serviceName: http-svc
          servicePort: 80
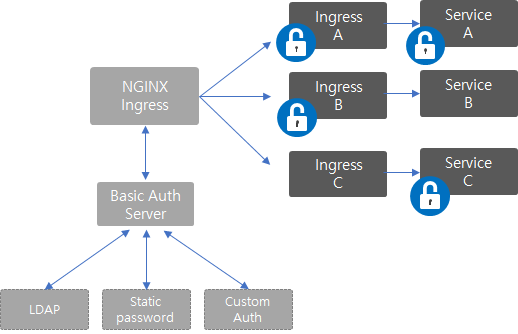
External Basic Auth
앞서 살펴본 Basic Auth 파일을 통한 인증이 아닌 외부 Basic Auth 서비스를 이용하여 인증을 하는 방식입니다. 사용자가 직접 custom authentication 서버를 개발할 수도 있고 외부 LDAP 서버를 통하여 인증 체계를 구성할 수도 있는 유연함을 가질 수 있습니다.
참고: https://kubernetes.github.io/ingress-nginx/examples/auth/external-auth/
1. Ingress 생성시 external basic auth 관련 annotation 추가
외부 basic auth 설정은 오히려 더 간단합니다. 외부 authentication 서버 URL을 설정하는 것이 전부입니다. 그럼 실제 외부 auth 서버를 설정하는 방법에 대해 살펴 보겠습니다. 예시에서는 간단하게 유저가 myuser이고 비밀번호가 mypass인 사용자를 가지는 외부 서비스입니다. (https://httpbin.org/basic-auth/<user>/<password>)
apiVersion: networking.k8s.io/v1beta1
kind: Ingress
metadata:
  annotations:
    # auth-url에 외부 basic auth 서버 URL 설정
    nginx.ingress.kubernetes.io/auth-url: https://httpbin.org/basic-auth/myuser/mypass
  creationTimestamp: 2016-10-03T13:50:35Z
  generation: 1
  name: external-auth
  namespace: default
  resourceVersion: "2068378"
  selfLink: /apis/networking/v1beta1/namespaces/default/ingresses/external-auth
  uid: 5c388f1d-8970-11e6-9004-080027d2dc94
spec:
  rules:
  - host: external-auth-01.sample.com
    http:
      paths:
      - backend:
          serviceName: http-svc
          servicePort: 80
        path: /
2. 외부 auth 서비스 개발
아래와 같이 LDAP서버로 인증을 하는 간단한 웹서버를 개발합니다.
import os
import traceback
from flask import Flask
from flask import request
from flask import Response

import base64

from ldap3 import Server, Connection, ALL


app = Flask(__name__)

@app.route('/_external-auth-Lw')
def hello():
    try:
        auth = request.headers.get('Authorization')
        auth = auth.split(' ')[-1]
        user_pw = base64.b64decode(auth).decode('utf-8')
        user, pw = user_pw.split(':')
        connection = Connection(LDAP_SERVER, user=user, password=pw)
        bind = connection.bind()
        connection.unbind()
        if bind:
            return "hello", 200
    except:
        traceback.print_exc()

    return Response('Unauthorized', 401, {'WWW-Authenticate':'Basic realm="Login Required"'})

if __name__ == '__main__':
    app.run(host='0.0.0.0')
인증서버 구축이 완료 되면 Ingress의 annotation 설정 nginx.ingress.kubernetes.io/auth-url 을 해당 인증서버 주소로 수정하면 됩니다.
curl -H "Authorization: Basic $(echo -n $LDAP_USER:$LDAP_PW | base64)" http://external-auth-01.sample.com
마무리
외부 공개 서비스를 운영시 정식으로 사용자 인증 체계를 구축하는 것이 당연하지만 사내 서비스 혹은 외부 서비스이긴 하지만 일반인들에게는 공개되지 않은 서비스인 경우, 최소한의 보안 유지를 위해 NGINX Ingress에서 제공해주는 Basic Auth 인증을 고려해 보는 것도 나쁘지 않아 보입니다.